
What's for Supper - salmon en croute
En croute means in pastry, and what a lovely idea it is to enrobe something already delicious in pastry, to arrive at something even more indulgent and yummy. It does make timing very challenging for the cook, as you have no way of knowing if the fish or meat is cooked inside the parcel. You need to follow a reliable recipe, preferably one you have tried and tested before.
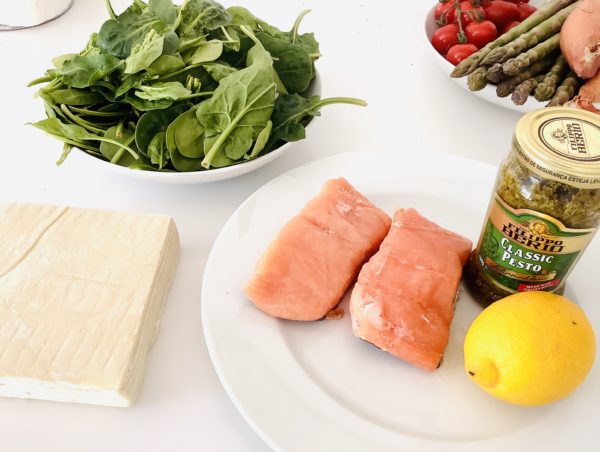
This easy Sunday supper recipes uses the following and it serves 3, not just two. Eating cold, allowing yourself a little dollop of mayo, is possibly even nicer than eating it warm...
2 salmon fillets
275g puff pastry
A dollop of Pesto
A little lemon juice
Sea salt and ground pepper
1 egg
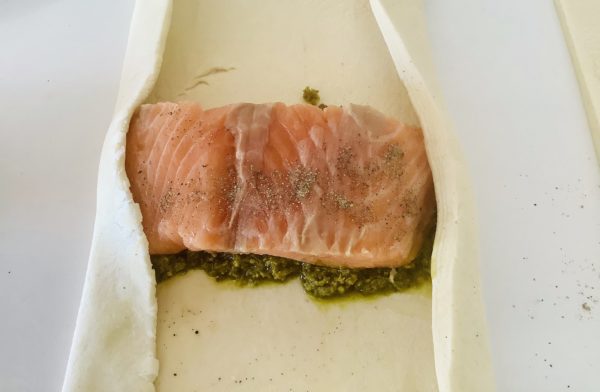
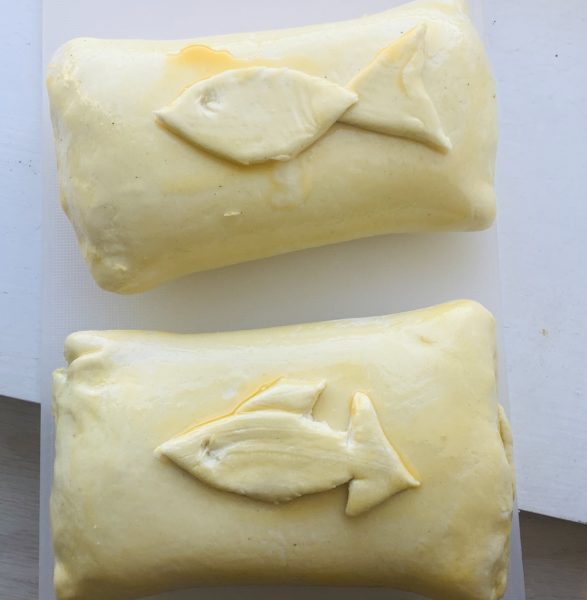
If you are using ready rolled puff pastry all you need to do is cut to size. If, like me, you are using a block of pastry, place it on a very lightly floured surface, dust with a little flour and roll out to desired size. Roll out to about 2-3mm thickness, that would be about the thickness of a 20p coin. If it is as thick as a £1 coin it is too thick. There will be some waste of pastry, as you cut off to fit the size of you salmon.
Having cut away the skin from the salmon fillets, I want that side to face down in the parcel and the pesto to be on top when I cut into the parcel, so I started with placing a bit of pesto on the pastry, then put the salmon skinned/slightly discoloured side facing me. I seasoned and squeezed over a little lemon juice.
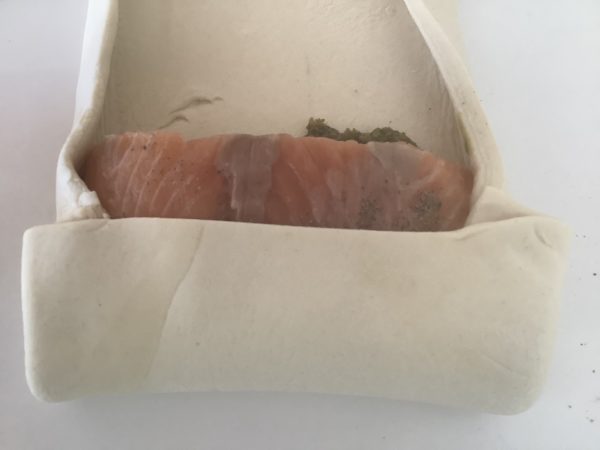
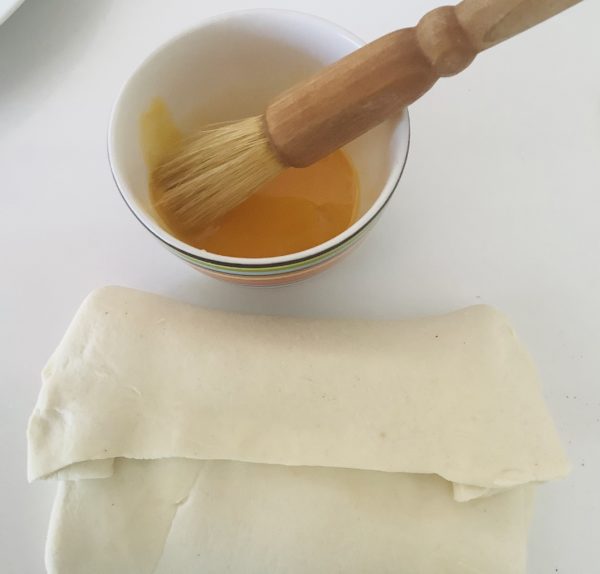
Enrobe the salmon and seal with egg yolk. Pinch in seams and flip over.
Whilst I would considers myself reasonably apt at food presentation, I don't posses even a smidgeon of creative talent when it comes to cutting, shaping or forming. But I don't need to tell you this - it is obvious form this photo.
Put the parcels in the fridge for 20 minutes to half an hour (or longer).
Preheat the oven to 200C. Place on a paper lined baking sheet and bake for 20 minutes.
The puff pastry should be deep golden brown, and cooked right through. The salmon will be well cooked, but moist. I prefer salmon to be just short of being cooked, with a central core of coral coloured, less cooked fish. But I am happy with it cooked a little further for this dish, as it keeps really moist inside the pastry parcels.
A golden rule of thumb in culinary terms is that when you enrobe or top with pastry, you do not serve more carbs with the dish.
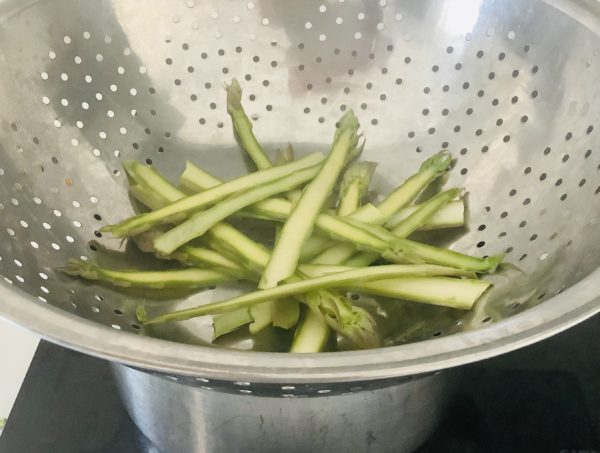

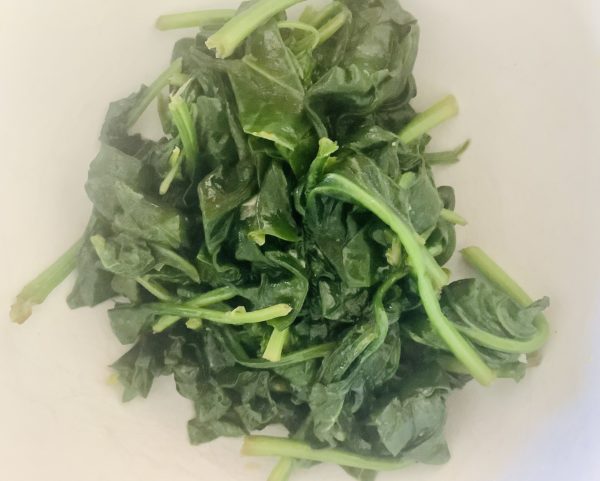
I am going to serve my salmon parcels with a salad of tender leaves, raw and steamed asparagus, and some wilted spinach. You could cream the spinach, which is one of my favourite ways to enjoy it, but with the rich pastry and the flavour of pesto, I think just plain wilted, with a little butter and plenty of salt, is right for this. To wilt spinach, pack at least 150g per person into a large saucepan, into which you have put a good knob of butter and one teaspoon of water, a good pinch of sea salt and, if you have it, a little grated nutmeg. You can be brutal with the raw spinach and push it down in the saucepan. Turn up the heat and turn the spinach using tongs as it starts to wilt. It will wilt down very quickly, we are talking a couple of minutes at the most from start to finish.
Asparagus should be cooked al dente and the further away from water the better the result.
So never immerse in water. Steam if you want clean tasting and tender spears, which I do for my salad here, but otherwise it fares much better when roasted briefly in the oven, griddled or tossed briefly in a hot pan, with a little oil and butter. Raw asparagus tastes exactly like fresh peas and its lovely to use, shaved lengthways in a tender leaf salad to which you also add some steamed spears. Make a dressing from olive oil, lemon juice, sea salt, a little honey and scatter over some Parmesan shavings. The Parmesan works particularly well here as the salmon is topped with Pesto, in which Parmesan, or Pecorino, is an essential flavour.

What's for supper tomorrow...
Home made pizza! All that flour and yeast must be out there somewhere...you will need strong bread flour for this. Get the children involved - this is so much fun to make with the kids.
What's for Supper - Easter Sunday with confit salmon & oven dried tomatoes with celeriac mash
After so many warm and sunny weeks in Cambridge, I am glad to be using up the last of my winter root vegetables, which were stored in a shady corner of my balcony. With this mash, the last Celeriac of the season goes and I am now mentally and culinarily ready to move on to new potatoes and asparagus!
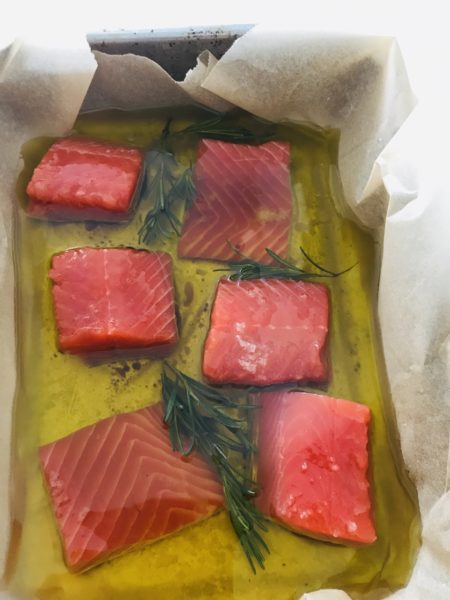
In French, confit, means a preserve, a jam, and it is the kitchen term for cooking something slowly with an aim to preserve it. The food can be slow cooked in oil, or a sugar and water, at low temperatures over a longer period of time than cooking at normal temperatures would require. The most well known savoury dish is confit duck, where the slow cooked duck legs are left to cool down, and kept completely buried in the cooking fats, thus hermetically sealed in. This method allows for fresh duck to be kept for months on end. When using confit'ing to cook fish or vegetables at low temperature, in a fat, the aim is not so much to preserve, more to gain the benefits which are unrivalled succulence and none of the usual dimming of colour associated with other cooking methods. The green of vegetables is just as vibrant after being confit'ed as is the bright red of wild salmon.
The results are similar to those acquired by sous vide cooking (sous vide meaning "under vacuum"), where food is vacuum packed into plastic bags before being immersed in a water bath and kept at a constant low temperature for many hours, often over night, so it's ready to quickly brown and serve for service. It cuts down on waste, as there is no shrinkage during cooking, it makes the work of chefs infinitely easier as there is no need to check the food while cooking to gauge if the interior temperature and consistency is exactly as required when there is only the exterior to go by; and it also guarantees the same result over and over. So a method introduced to make life in big kitchens easier, became all the rage as it results in tender, succulent and vibrant looking food, cooked in its own juices.
Slow cooking at low temperature, in oil, results in meltingly delicious and soft protein, plant and animal based. I tend to give my confit salmon a Swedish touch by gently rubbing in sea salt and sugar and leaving it like that for about 30 minutes before I cook it. Today I added some rosemary as well, before immersing it in olive oil and cooking it at 70C - one of the very lowest settings for my oven. The time depends on the size of the pieces of salmon, but for small pieces like mine, about half an hour sufficed. The fish should be cooked - just - but won't be firm as it is when oven roasted or pan fried, but tender and soft.
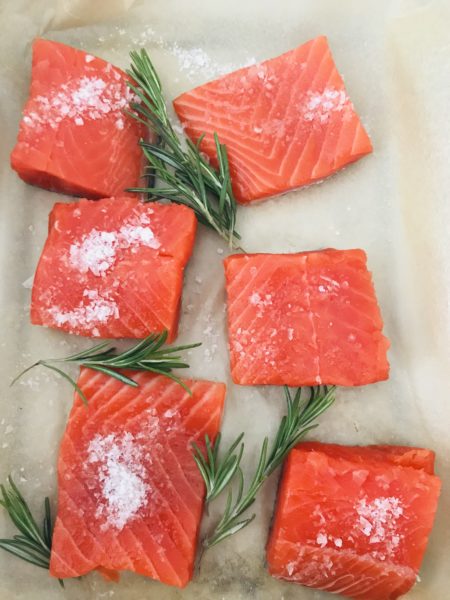
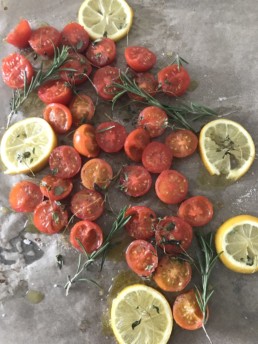
While so many shelves were empty in the shops after those frantic days before lock down, one shelf remained miraculously resplendent; the tomato shelf. Either we have a serious over supply of tomatoes or tomatoes were rejected in the rush to buy long life ingredients. I decided to use another slow cooking method for my ample supply of cherry tomatoes - oven drying until demi-sec, not totally dried. I added some sliced lemon and some more of my fresh rosemary, sprinkled on sea salt and tiny bit of sugar, poured a little oil over and left them in an oven for 90 minutes, at a temperature of 120C.

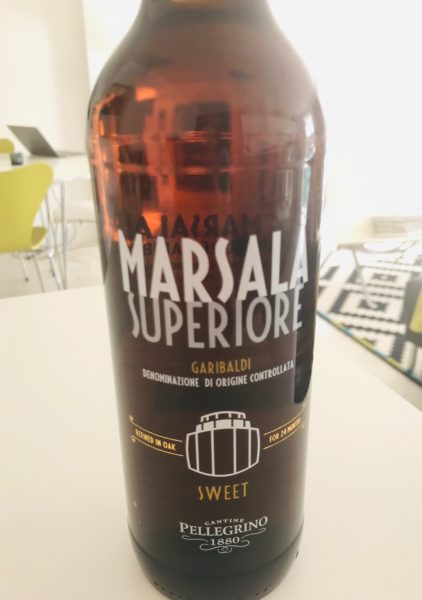
With both the salmon and the tomatoes taking care of themselves in the oven, I turned my attention to making celeriac mash. Cut away the skin, cut into cubes, simmer in salted water until soft, mash. Beat in butter and a little full fat milk. I always add a little cream, if I have it, to any mash I make. I often throw in one large, cubed, King Edward potato with a celeriac or parsnip mash as it gives a smoother texture when mashed. For one celeriac I used almost 100g butter and about 100ml milk/cream. Rich, yes, but serving 8 (with my portion control, anyway) that is not bad. And it is a treat. If you are keen to restrict fat, the you could roast the celeriac, whole, wrapped in foil, for a couple if hours, or slice it and cook with with already softened sliced onion, in a stock, to make a delicious Boulangère or bake it with a few knobs of butter, some herbs and a few good splashes of that favourite stove side tipple of mine, Marsala wine!
What's for supper tomorrow
Delicious plant based, Indian inspired favourites from another outstanding chef on our team, Jackie Hobbs. A bank holiday feast of Red lentil Dahl, roasted sweet potato with fennel and cumin, Coconut relish and yoghourt raita with mint and cucumber. Join us at the table!

What's for Supper Breakfast special - 5 second scramble
In preparation for my Monday morning zoom yoga class with local teacher and café regular Helen Pomeroy, I felt some protein was in order. What better than a 5 second scramble. A healthy, lean protein breakfast, brunch or lunch which takes a total of three minutes to make if you include toasting bread, getting your utensils out, cooking and plating up! Not many dishes deliver that.
We often get asked by our guests in the café how we make our popular scramble. Fast and furious are the key words. We use eggs, a teaspoon of sunflower oil and full heat under the pan. No cream, no water and most definitely no milk.
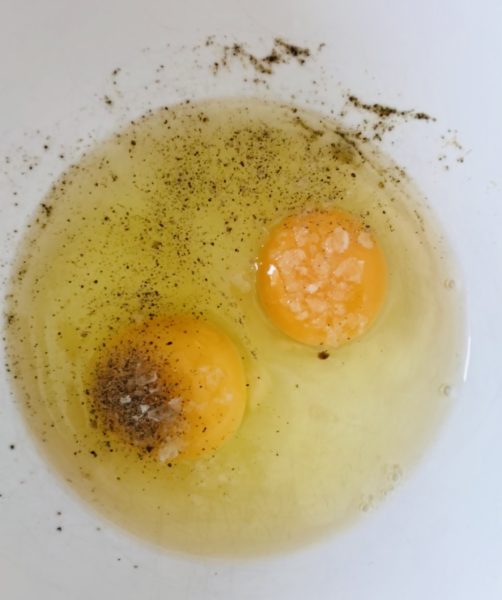
Break up the eggs using a fork. Don't whisk, just mix to create an elastic texture.
While you do this, whack the heat up under you frying pan in which you have poured about half a teaspoon of sunflower oil. Tip in the eggs, spatula or fork at the ready - as shown in the little video clip here. Some of may shudder at the sound of my stainless steel fork in my non stick pan. There is something about plastic, silicon and rubber utensils that I find unappetising and quite annoying, so I prefer a fork, applied with a light touch. So far, my trusted pans remain unscathed.
SCRAMBLE clip
Tip the scramble onto a piece of toasted sour dough. I love adding Sriracha sauce - creamy egg and hot chilli is a match made in heaven. I am also unapologetic about my love of parsley.
What's for supper this evening
My recipe for supper this evening will be my take on Borscht - a savoury, umami-redolent, muscular Beast from the East soup. All you will need is potato, beets (raw) onion, garlic, stock...
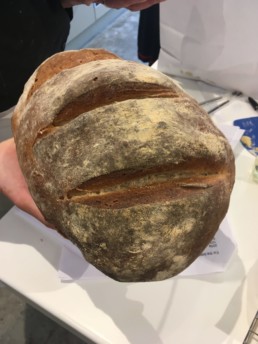
What's for Supper Weekend Bread Special 3: how to make a sour dough loaf
Our bread making classes remain the most rewarding classes to run for me and my team of Leiths and Cordon Bleu trained teaching chefs. For so many of our attending guests, they are life changing. The Beginners Bread class was the very first class that I designed back in 2009, out of our now 40 odd categories of classes. As an artisan baker, my heart and soul is in bread making in a way which it simply isn't when it comes to cakes or desserts.
If you have followed my instructions on how to make a starter and you are now the proud owner of a lively, bubbling, healthy looking starter ready to become the first of many sour dough based loaves, congratulations! Let's get baking.
Just to recap, we created a starter from 3 x 90g flour/100g water so the starter consists of 270g flour and 300g water. A total weight of 570g. I start each baking session by feeding my starter one of its 90g flour and 100g water just to give it a boost. Leave it on your kitchen work top, ie in room temperature.
After 3 hours or so, you should see a "doming" on the surface of the starter - this indicates that the starter is at its most active state and ready to start baking with.
To make a modestly sized loaf, measure out 200g of starter, of which 94.5g is flour and 105g water.
Now feed the remaining starter another portion of 90g flour and 100ml water, and leave it out for an hour or two to revive it, then introduce it to its new home: the fridge. The importance of temperature on sour dough is the first thing for any successful baker to understand. I will come back to this, but now, let's focus on making a loaf.
Add to your 200g starter 300g flour and 200g water. This brings the total amount of flour in the dough to 395g and the total of water to 305g. This means a hydration level of 77%. Hydration - ie how much water to flour - is something most bakers of sour dough will discuss and compare - to the point where it often becomes rather competitive - the wetter the dough, the more impressive! Your dough should be loose and sloppy, but not runny.
ONE MEDIUM SOUR DOUGH
200g sour dough starter
300g strong white flour or a mix of 200g white and 100g rye
200g water
7g fine sea salt
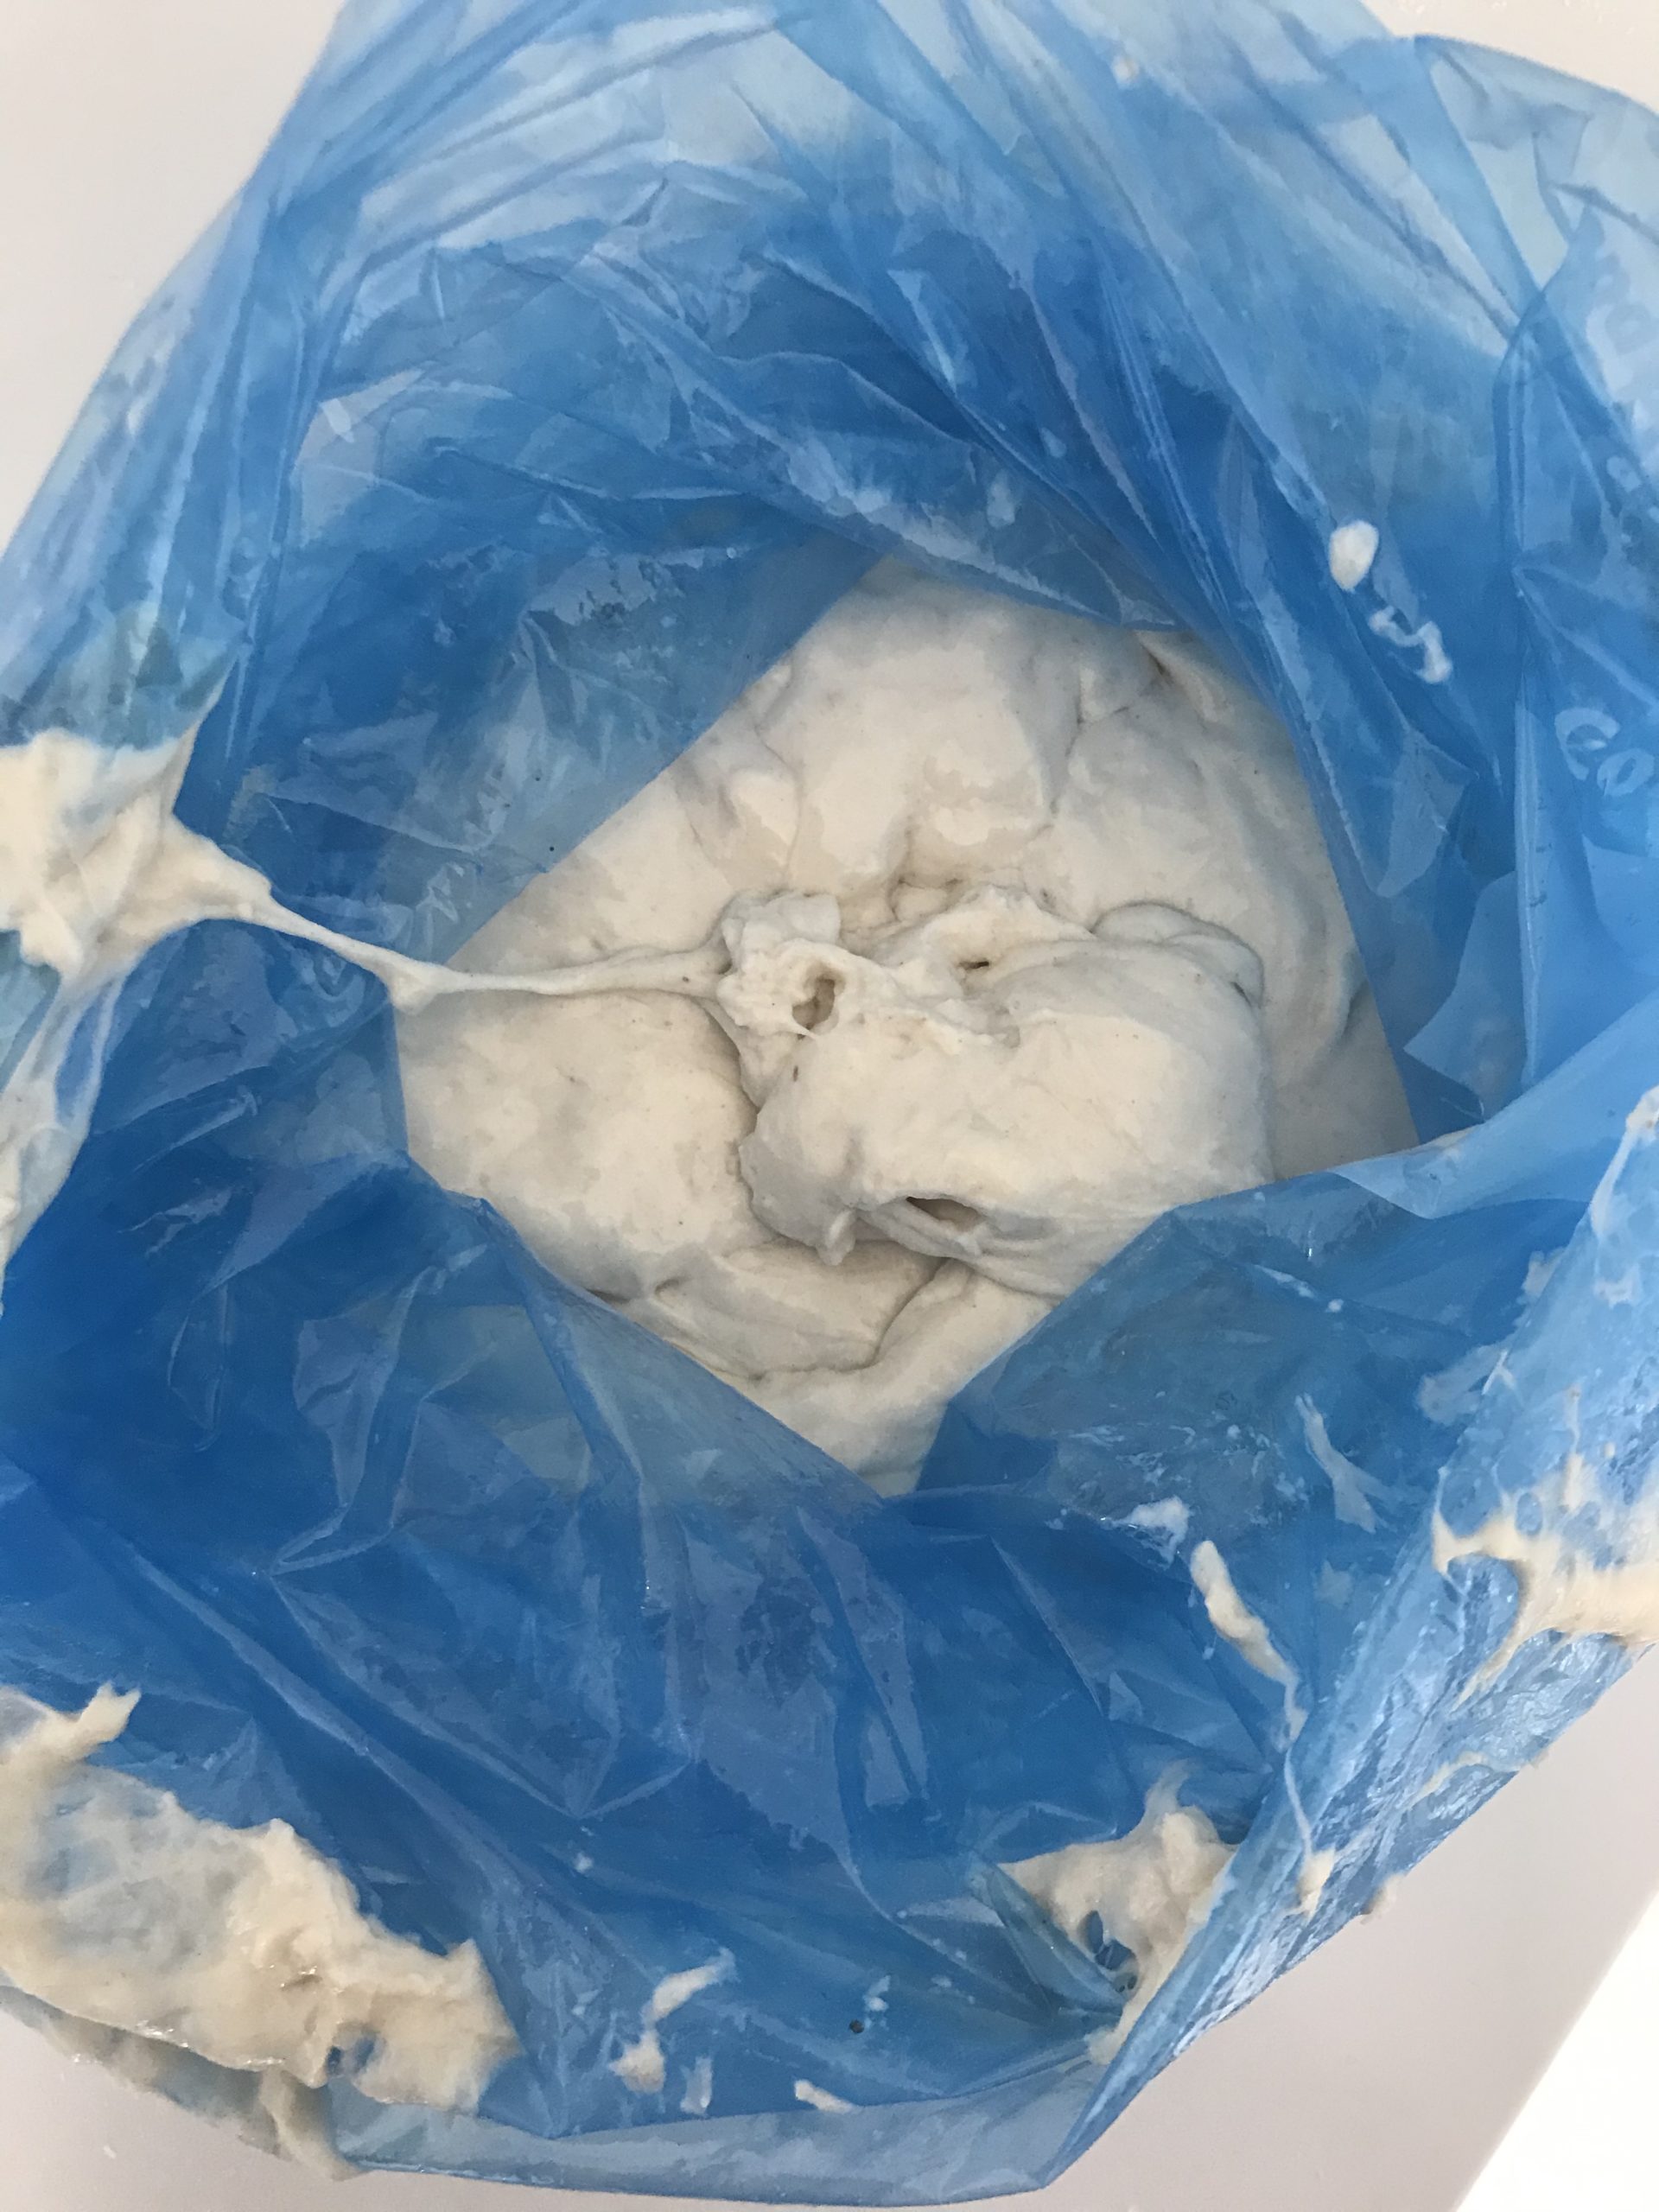
- Mix and knead until stretchy and elastic. You will struggle at first to knead such a wet dough. Use a plastic dough scraper if you have one, to lift and slap down the dough. Work it, to develop gluten, for about 8-10 minutes. Tip into a lightly oiled, large plastic bag and leave to rise in the fridge over night.
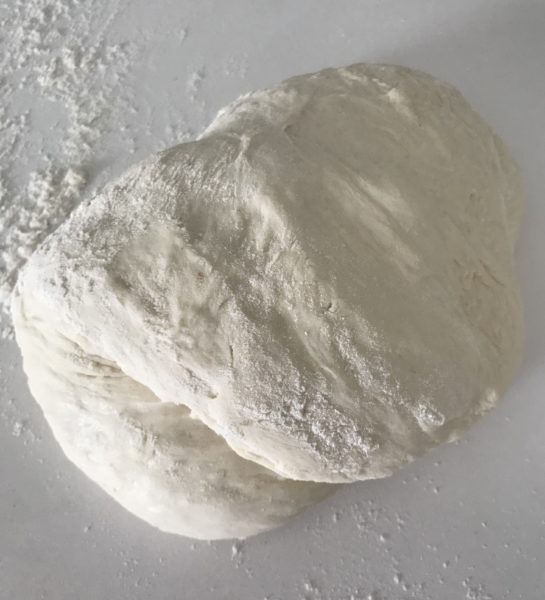
- The next morning, tip out the dough, give it a little knead and flatten out slightly, then fold in towards its centre. Repeat this, striving to create surface tension by pulling the "skin" of the dough into the fold, making a tight ball. Think of tucking hair under a swimming cap or imagine you had cling film around the dough and you are trying to putt that in to tighten. The more taut the "skin" of the shaped bread is, the more likely it is to keep its shape when baking and not shoot out odd looking bubbles on the side.
 Tip, seam side up, into a floured proving basket if you happen to have a proving basket. If you don't, just place it on a floured baking sheet.
- Drape a clean tea towel loosely over the loaf and leave to prove for 2-3 hours.
- Heat oven to 210C, with an empty roasting tray at the base of the oven.
- If you have been proving in a basket, gently tip out the dough on a floured baking sheet. If your dough is already on a floured baking sheet you are ready to score it with a sharp knife - or use scissors to snip into it. This will also help the bread to keep its shape when baking.
- Tip a glass of cold water into the hot roasting tray at the bottom of your oven, to create steam and encourage crust and a quick setting of the bread's shape, and then put the bread in. This can be omitted as there is no risk your loaf won't have a good crust on it.
- Bake for 45 minutes or until hollow sounding when tapped on the bottom.
- If you wish you can of course double the quantity of dough to make a larger loaf and if so, bake it for at least an hour, perhaps a little longer.
- Leave the loaf to cool down before cutting into it to give
Understanding the importance of Temperature
When not in use, a starter needs to be kept in a sealed container in the fridge. While in a cold temperature, a wild yeast starter will be dormant - think of it as being in a state of hibernation - and will revert to looking “flat” and lifeless just like your original mixture before yeast developed. To revive it for baking, bring it to room temperature, feed it and leave it for a couple of hours to become active and healthy. If you bake every day, the starter can be kept in a cool room temperature as it will be constantly used and revived. What a wild yeast starter can’t survive is being left in an ambient temperature for a long periods of time without being fed fresh flour and water. This will result in the "bad" bacteria winning the war over the good ones, and the starter will start to smell very strongly acidic and vinegary and will eventually succumb - the bad bacteria will have won the battle over the good ones. With patient, constant feeding at regular 2-4 hour intervals, you should be able to nurse your poorly starter back to health. To maintain a healthy starter, feed it weekly by bringing it to room temperature, decanting off a little, then feeding it fresh water and flour and returning it to the fridge once revived.
Sour dough fans have been known to bring their starter out with them in the garden – sitting quietly under a rose bush or on a garden table, meeting new, incoming yeast spores. Looking after sour dough is a nurturing process. Look after your sour dough, feed it, refresh it and use it regularly, and you will be rewarded by exceptional bread.
What's for Supper Weekend Bread Special 1: making a sour dough starter
Our bread making classes remain the most rewarding classes to run for me and my team of Leiths and Cordon Bleu trained teaching chefs. For so many of our attending guests, they are life changing. The Beginners Bread class was the very first class that I designed back in 2009, out of our now 40 odd categories of classes. As an artisan baker, my heart and soul is in bread making in a way which it simply isn't when it comes to cakes or desserts.
Quite a few of you have got in touch with questions relating to the lack of flour and keeping sour dough starters alive and well. Sour dough is, as those who bake it know, in a category of its own. Working with natural yeasts and ferments is so very different from baking bread with commercial yeast. But now is the time to try our hands at something different, and I thought I would create a post about how to create a sour dough starter.
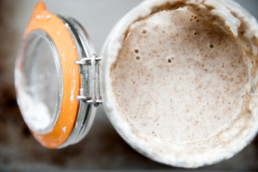
A starter is made simply from strong organic flour and water, in more or less equal quantity. I usually work with a starter which consists of 90g flour to 100g water. We keep litres of it in our kitchen at the school but at home you probably don't wan't to store more than 500g. Organic flour is important to ensure that there are no chemicals inhibiting the natural yeast bacteria in the flour.
These were my pots of starter during the 3-day creating process earlier this week.
The images don't convey the change in texture that you should expect, so here is a little film to show consistency
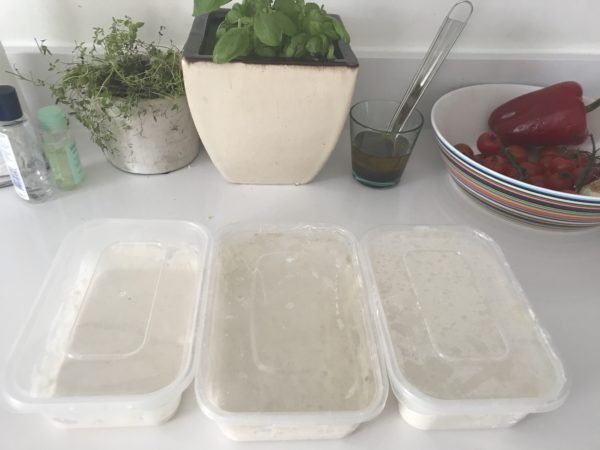
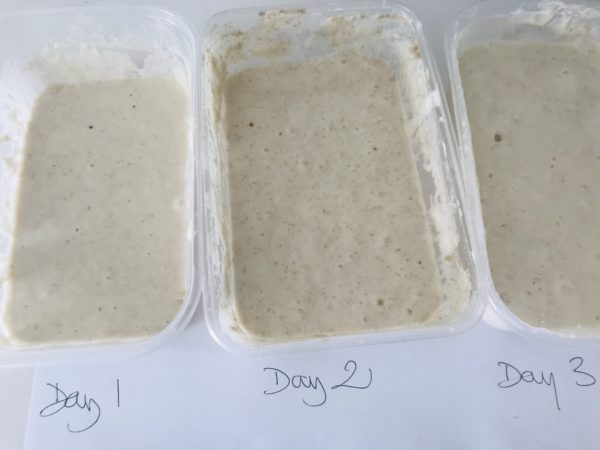
Day 1: 90g strong organic flour/100g water - creates a dense, flat gloop
Day 2: 90g strong organic flour/100g water - starting to develop air bubbles
Day 3: 90g strong organic flour/100g water - plenty of action, lots of air bubbles
Leave this on the kitchen work top - or outside, to capture local wild yeast spores in the air over the course of the 72 hours. To encourage yeast development when you first make a starter, you could add a few dried raisins or a little honey. Once the starter is healthy, it should be kept in the fridge. If left on the counter top in a warm kitchen, the fermentation will carry on and tip the balance of bacteria until it becomes a black, stinking mass. That requires emergency measures.
When I am getting ready to create a dough, I feed my starter again and leave it on my work top, in the warmth of my kitchen, to ensure it is at its most potent. Usually that will take about 90 minutes to 2 hours. This is what it should look like STARTER READY TO WORK WITH
If you have a starter already but have run out of strong and/or organic bread flour, you can feed your starter any flour, just to keep it alive and healthy. A plain flour won't have the gluten content required for making a good, structural bread, but it will sustain your starter until you can get hold of strong flour. Non-organic flour will have very little natural yeast spores left in it but you can help it along by placing the starter outdoors. You can use rye, 00 flour, plain, wholemeal, seeded, brown, spelt - anything but self rising. I know it's obvious but I will point it out anyway; self rising contains dry commercial yeast and it would kill off your wild ferment. A sour dough starter fed mainly on plain, or other less glutenous flours over a period of time can still be used to bake with. Try making milk rolls - recipe coming tomorrow - or enriched dough for cinnamon buns, hot cross buns etc where you are not aiming for a rustic loaf, but softer types of rolls and baked goods.
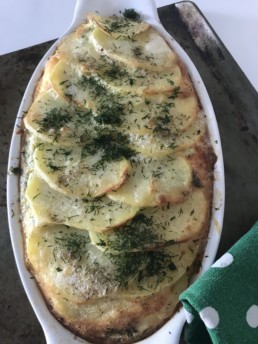
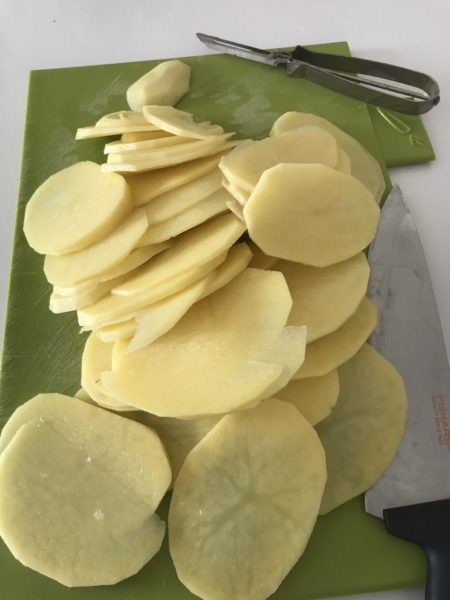
What's for Supper - Laxpudding or Swedish potato and smoked salmon gratin
Laxpudding is one of the most quintessentially Swedish dishes alongside Jansson's Temptation and Meat balls with lingonberry jam. It is a cheap everyday dish, despite the use of smoked salmon, of which one does not require very much. The main ingredient is the backbone of Swedish cuisine - potato, combining it here with a savoury custard of milk and egg, and of course dill, the herb which infuses so much of Swedish food and drink. Originally, Laxpudding, which hales from the far north where my mother grew up, was traditionally made using home cured Gravad Lax. Salmon was so commonplace on the Swedish table in the early 1900s that people were bored with it and begged not to be served it every day. The Bothnian Bay and the many rivers in the north were teeming with wild salmon so it was a cheap and common place protein.
Laxpudding has become one of the most popular dishes on our lunch menu in the café and I also think that it makes a perfect, light Friday Night supper served with a salad on the side.
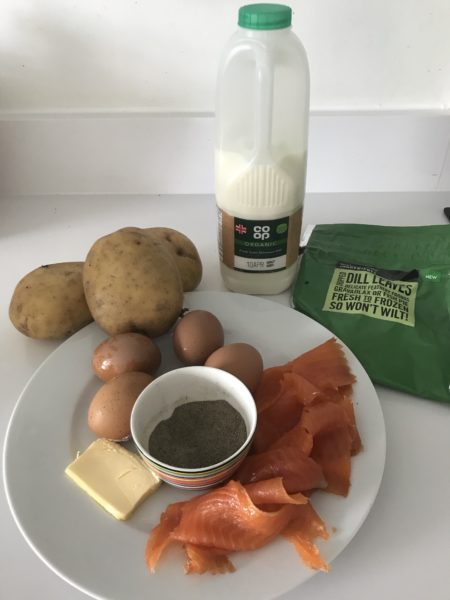

For 2
2 small or 1 large King Edward or similar potatoes, peeled and sliced
150g smoked salmon, torn into smaller pieces
1 tablespoon of finely chopped dill (I have fallen in love with the frozen herb bags from Waitrose)
3 eggs
300ml milk or combo of milk/cream if you have cream sitting around
Sea salt and black pepper
Set the oven to 180C.
Peel and slice the potatoes.
Using a fork, mix the eggs with the milk/cream
Butter an oven proof dish.
Arrange a layer of potato in the base followed by the salmon and dill.
Season with ground black pepper and some sea salt - not too much as the salmon is salty.
Top with a second layer of potato.
Pour over the eggy mix.
I like to dot a few small pieces of butter on top before placing in the oven.
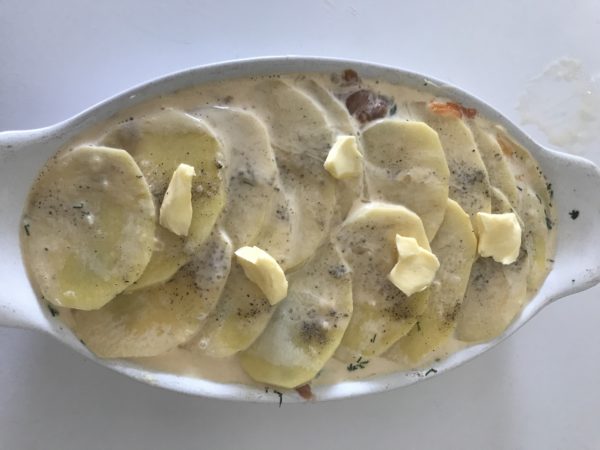
Bake for approx 45 minutes.
In Sweden, Laxpudding is served with melted butter and rye crisp bread on the side.
When enjoyed as a mid-week lunch or supper the drink of choice would be water or low alcohol beer. My wine recommendation for this salty, umami-redolent and creamy dish would be an equally rich white, say a Chardonnay or a Côte du Rhône Blanc.
Laxpudding is a must on any table for Easter, Midsummer or Christmas, the three big food events in Sweden, and for which more or less the same dishes are served. We stick to what we like! The classic drinks accompaniment for the festivities are lager and snaps - the much loved Swedish aquavit. Often flavoured with dill and cumin, and served ice cold in small shot glasses, it is the perfect accompaniment for Sweden's many salty, cured and pickled dishes.
We tend to get emotional when we eat and drink these iconic dishes, which means we want to sing. The songs accompanying snaps are plentiful and usually rather ribald. The themes are, to put it mildly, somewhat repetitive; the appreciation of snaps, the life enhancing qualities of snaps and a call to focus on where the next snaps is going to come from. The play on words, full of double entendre, is often rather clever - even if it relates mainly to the celebration of inebriaty, its effect on various bodily functions - not all negative - in a fashion that most 5 year olds would love. That's us Swedes - a basic lot. Skål!
Join me again for a weekend of home bread making
Judging by the disappearance of flour and yeast from the shelves even before the lockdown was announced, I assume that most of you have both these things in your pantry and that you might like a bit of advice on how to make fantastic bread without much effort! I am going to post the first of several blogs on Sour Dough today, so those who wish can create their first starter today. For tomorrow morning, a super simple recipe for little breakfast milk rolls.